Re-Modifying OpenVPN Source Code to Allow for Dual-Connection, Multi-Threaded, Load-Balanced Operation for Even More Performance!

This is a continuation of this original post in exploring the modifications that can be made to the OpenVPN source code to increase its overall performance: [post]

I’m still exploring how I can make this perform better and optimize the code more but I was finally able to build on top of the bulk-mode changes I had made in the last post and create a multi-threaded server and client model work together. It was tough to do because of the complexity of the code as well as not interfering with the TLS connection state variables and memory along the way.

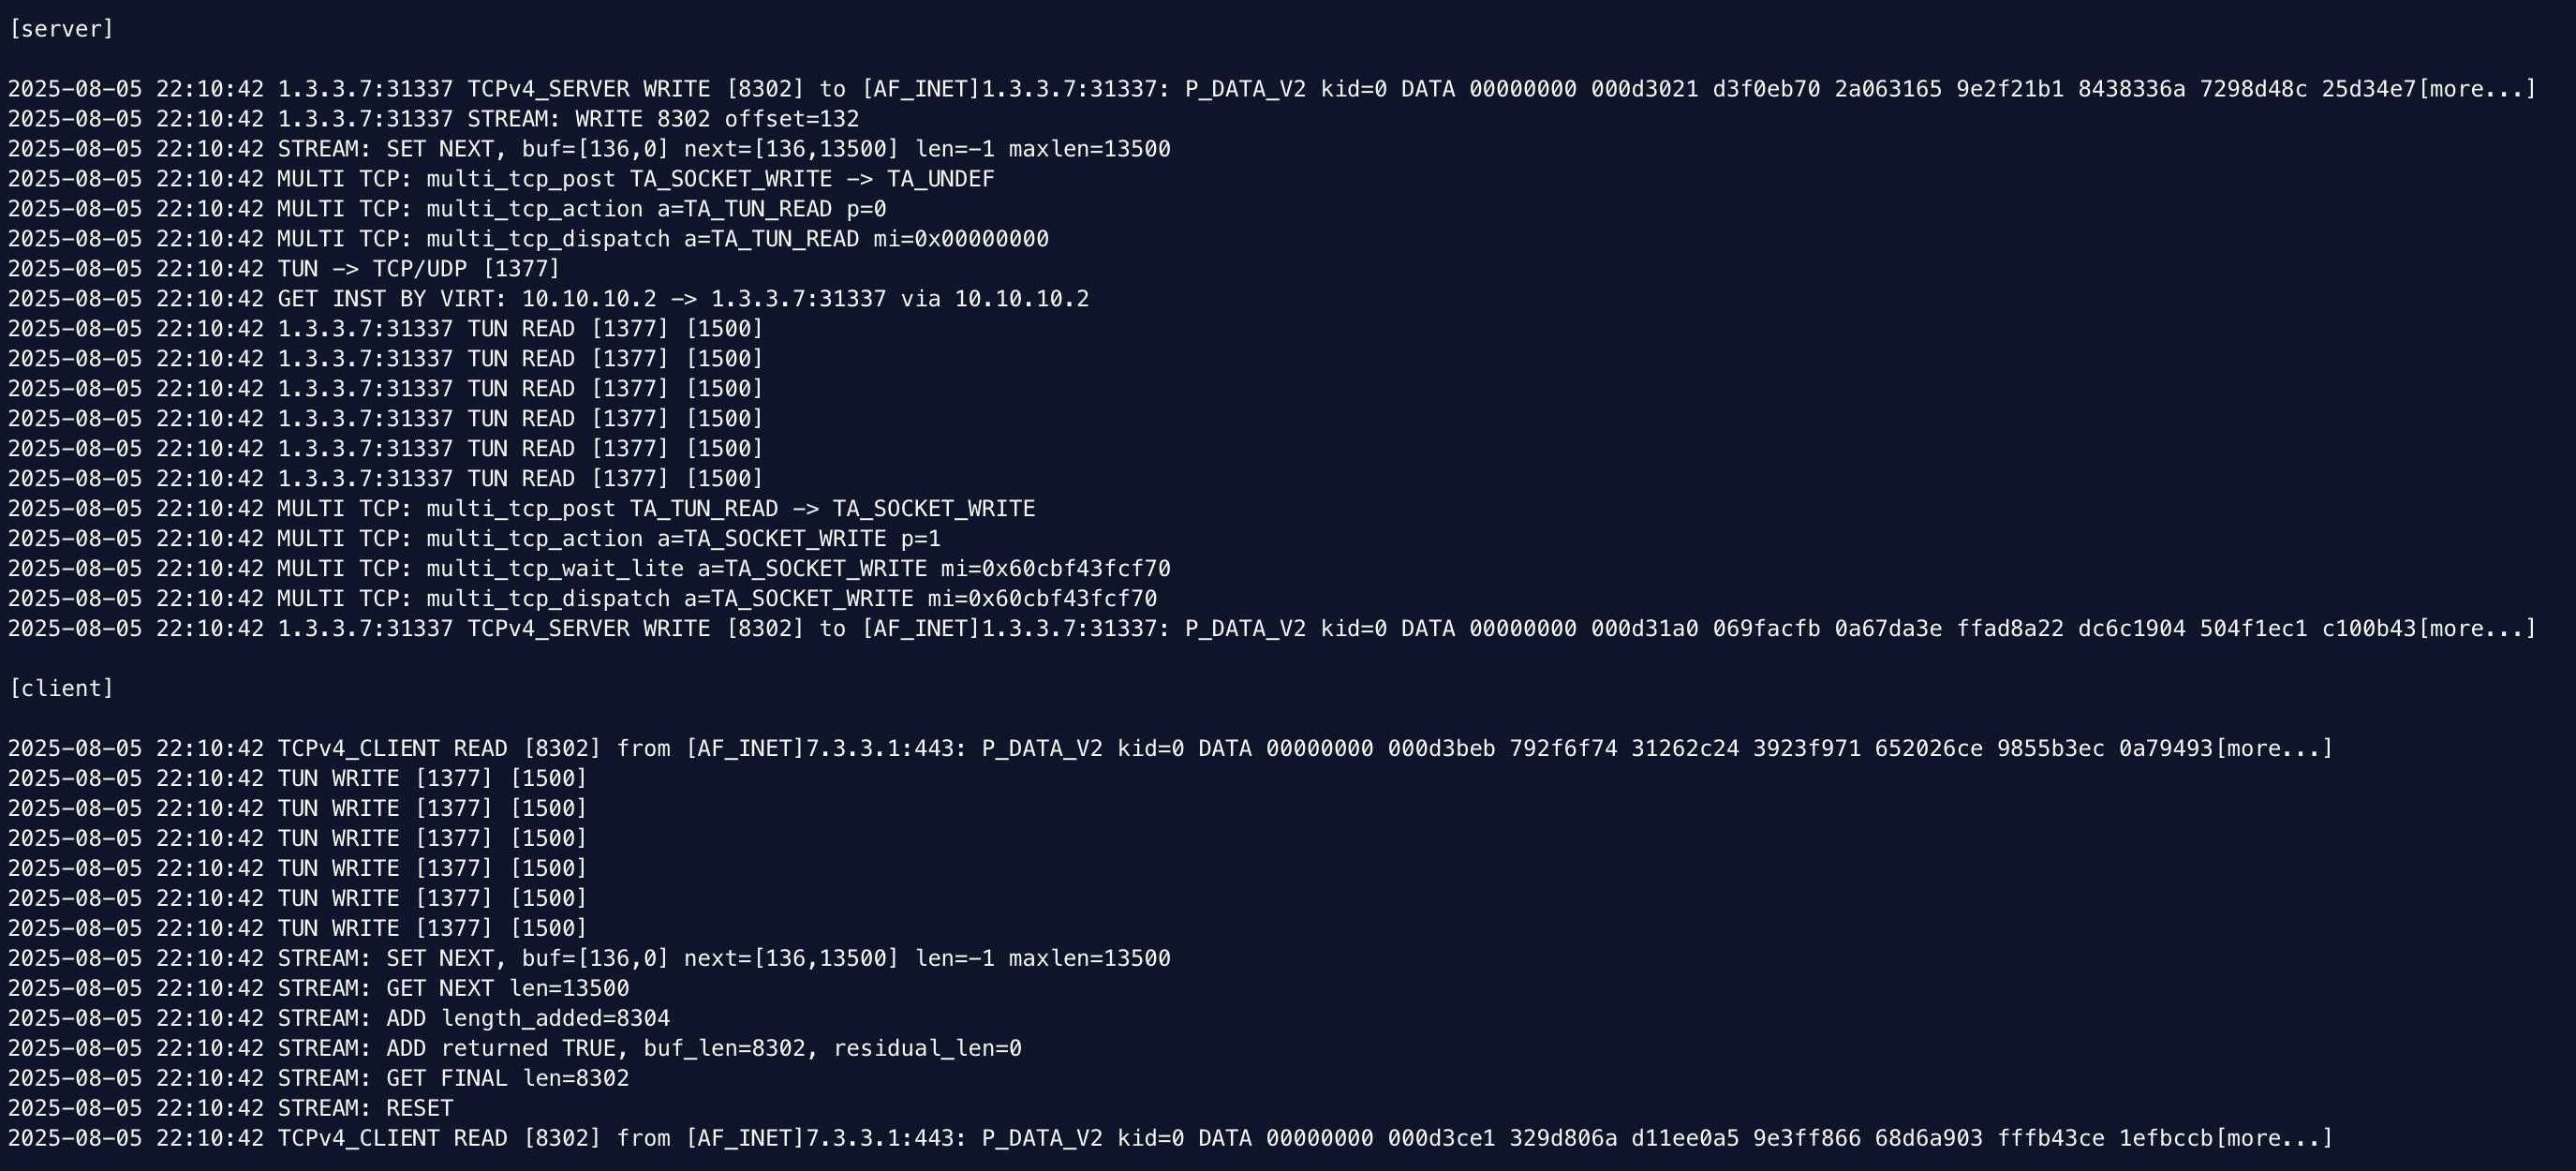
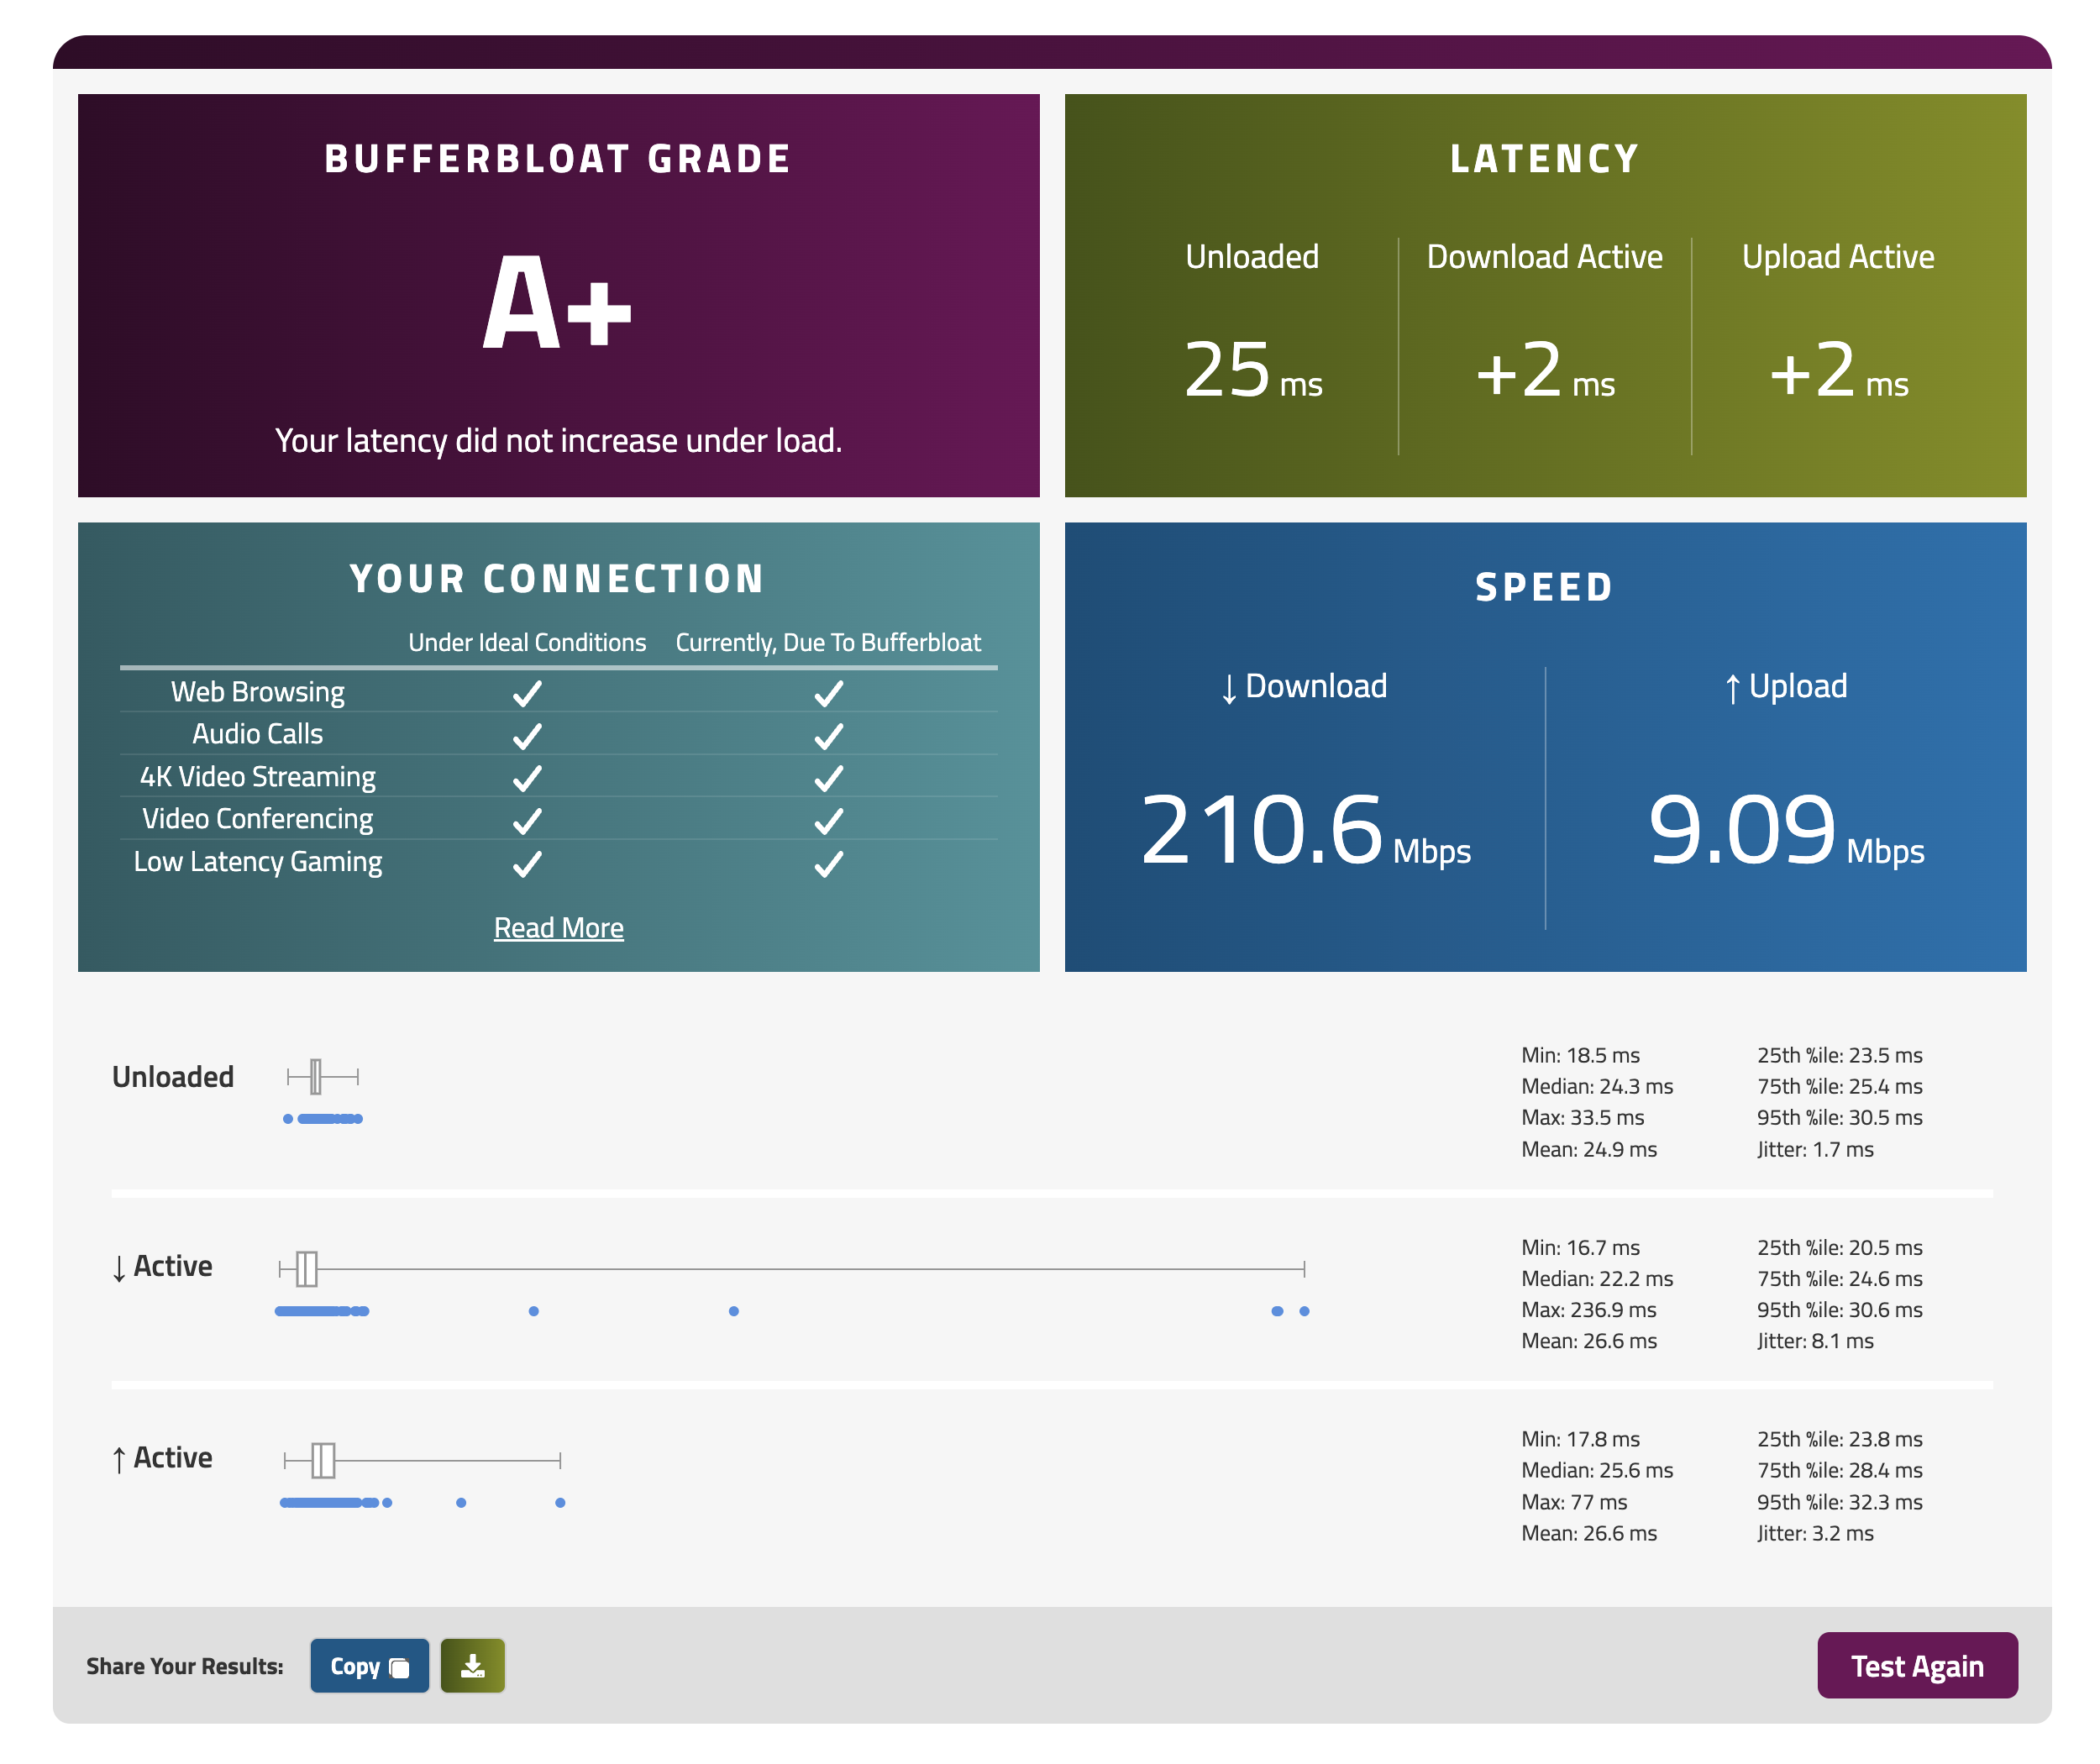
I was able to make the code spin off 4 threads which both share a common TUN interface for bulk-reads and then create 4 separate TCP connections to each perform a large bulk-transfer. The server will load balance the dual connections from the client across the threads based on the connecting IP address. I am also running 4 VPN processes with 4 TUN devices and using IP routing next hop weight to load-balance the traffic between them.

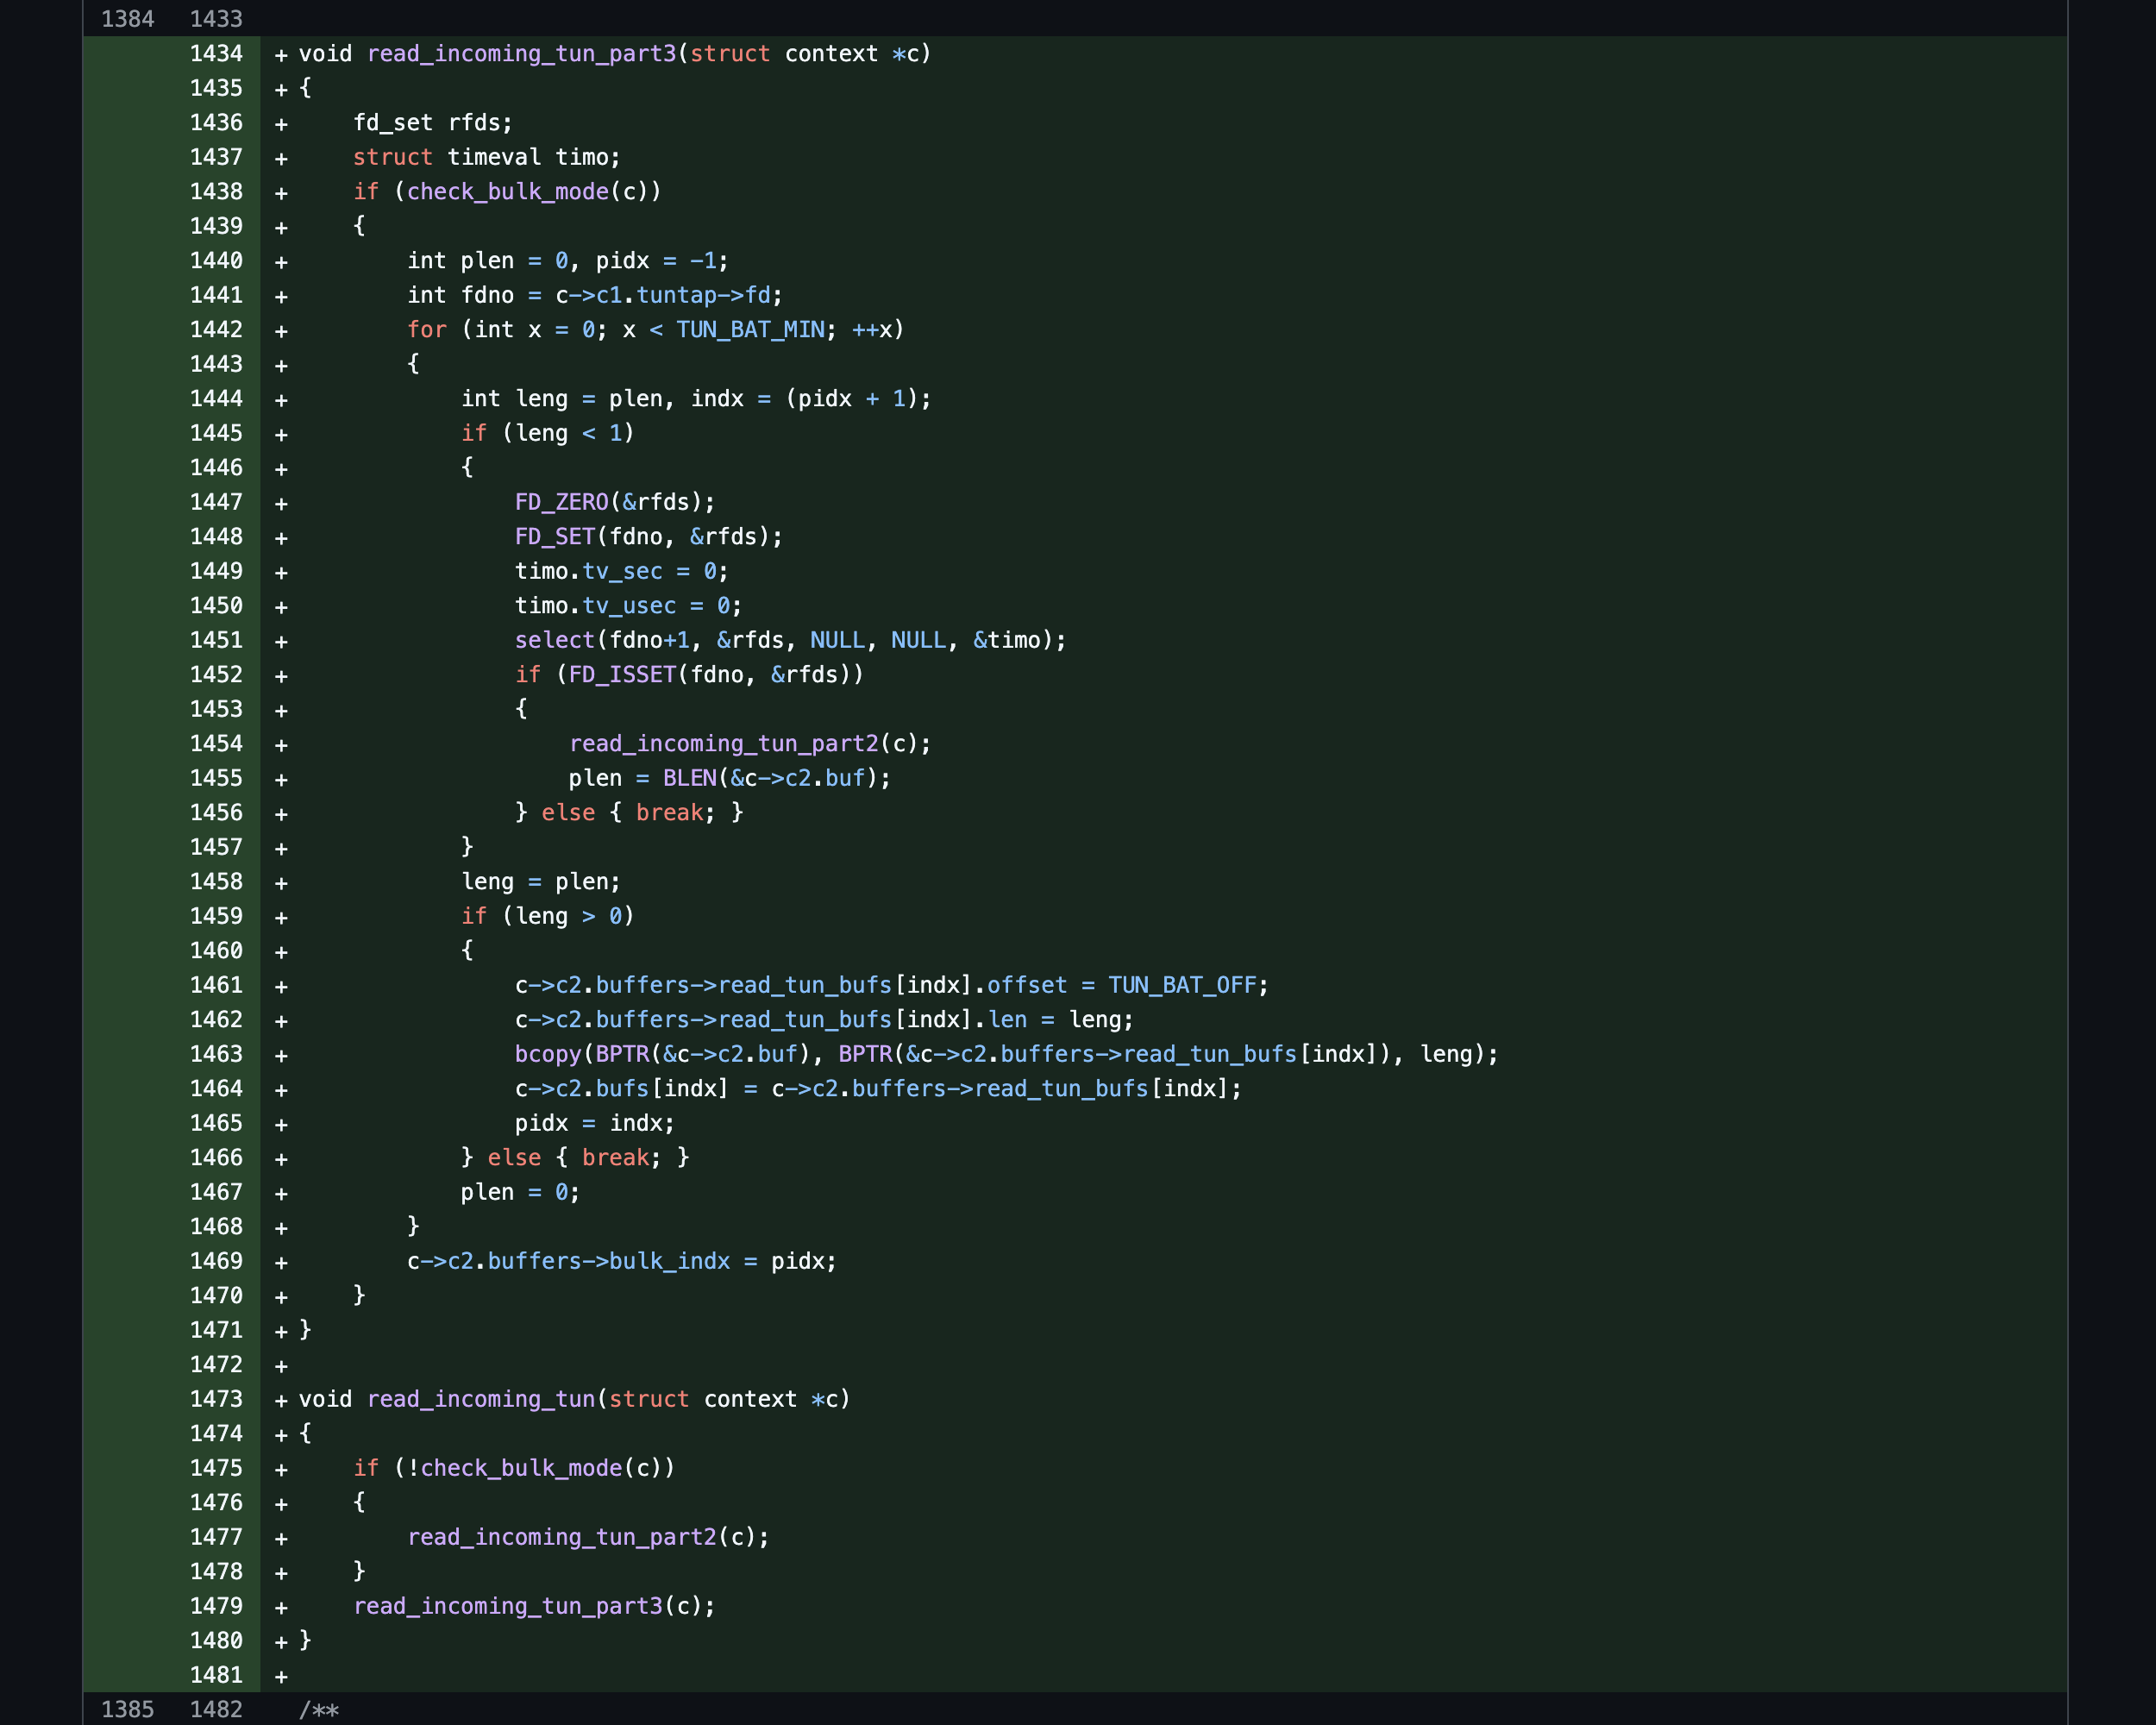
Update: I just implemented an extra management thread that is dedicated to reading from the shared TUN device and bulk filling the context buffers so that they can all run and process the data in parallel to each other now in a non-locking fashion (6 x 1500 x 4 == 36,000 bytes)!

Config Tips:

  • Ensure that your VPS WAN interface has a 1500 MTU (my provider was setting it to 9000)
  • Perform some basic sysctl network/socket/packet memory/buffer/queue size tuning (16777216)
  • Set the TUN MTU == 1500 && TX QUEUE == 9000 (properly sized middle pipe link)
  • Push && pull the snd ++ rcv buffer sizes from the server config to the client options (16777216)
  • Use elliptic curve keys and stream cipher crypto (more efficient algos for the CPU)
  • No more need for compression, fragmentation, or MSS clamping (–mssfix 0)
  • Use a smaller timeout nftables values for fewer forwarded traffic table connection states (conntrack time_wait for udp/tcp)

Bulk-Mode ++ MTIO-Mode

~

~

~

~

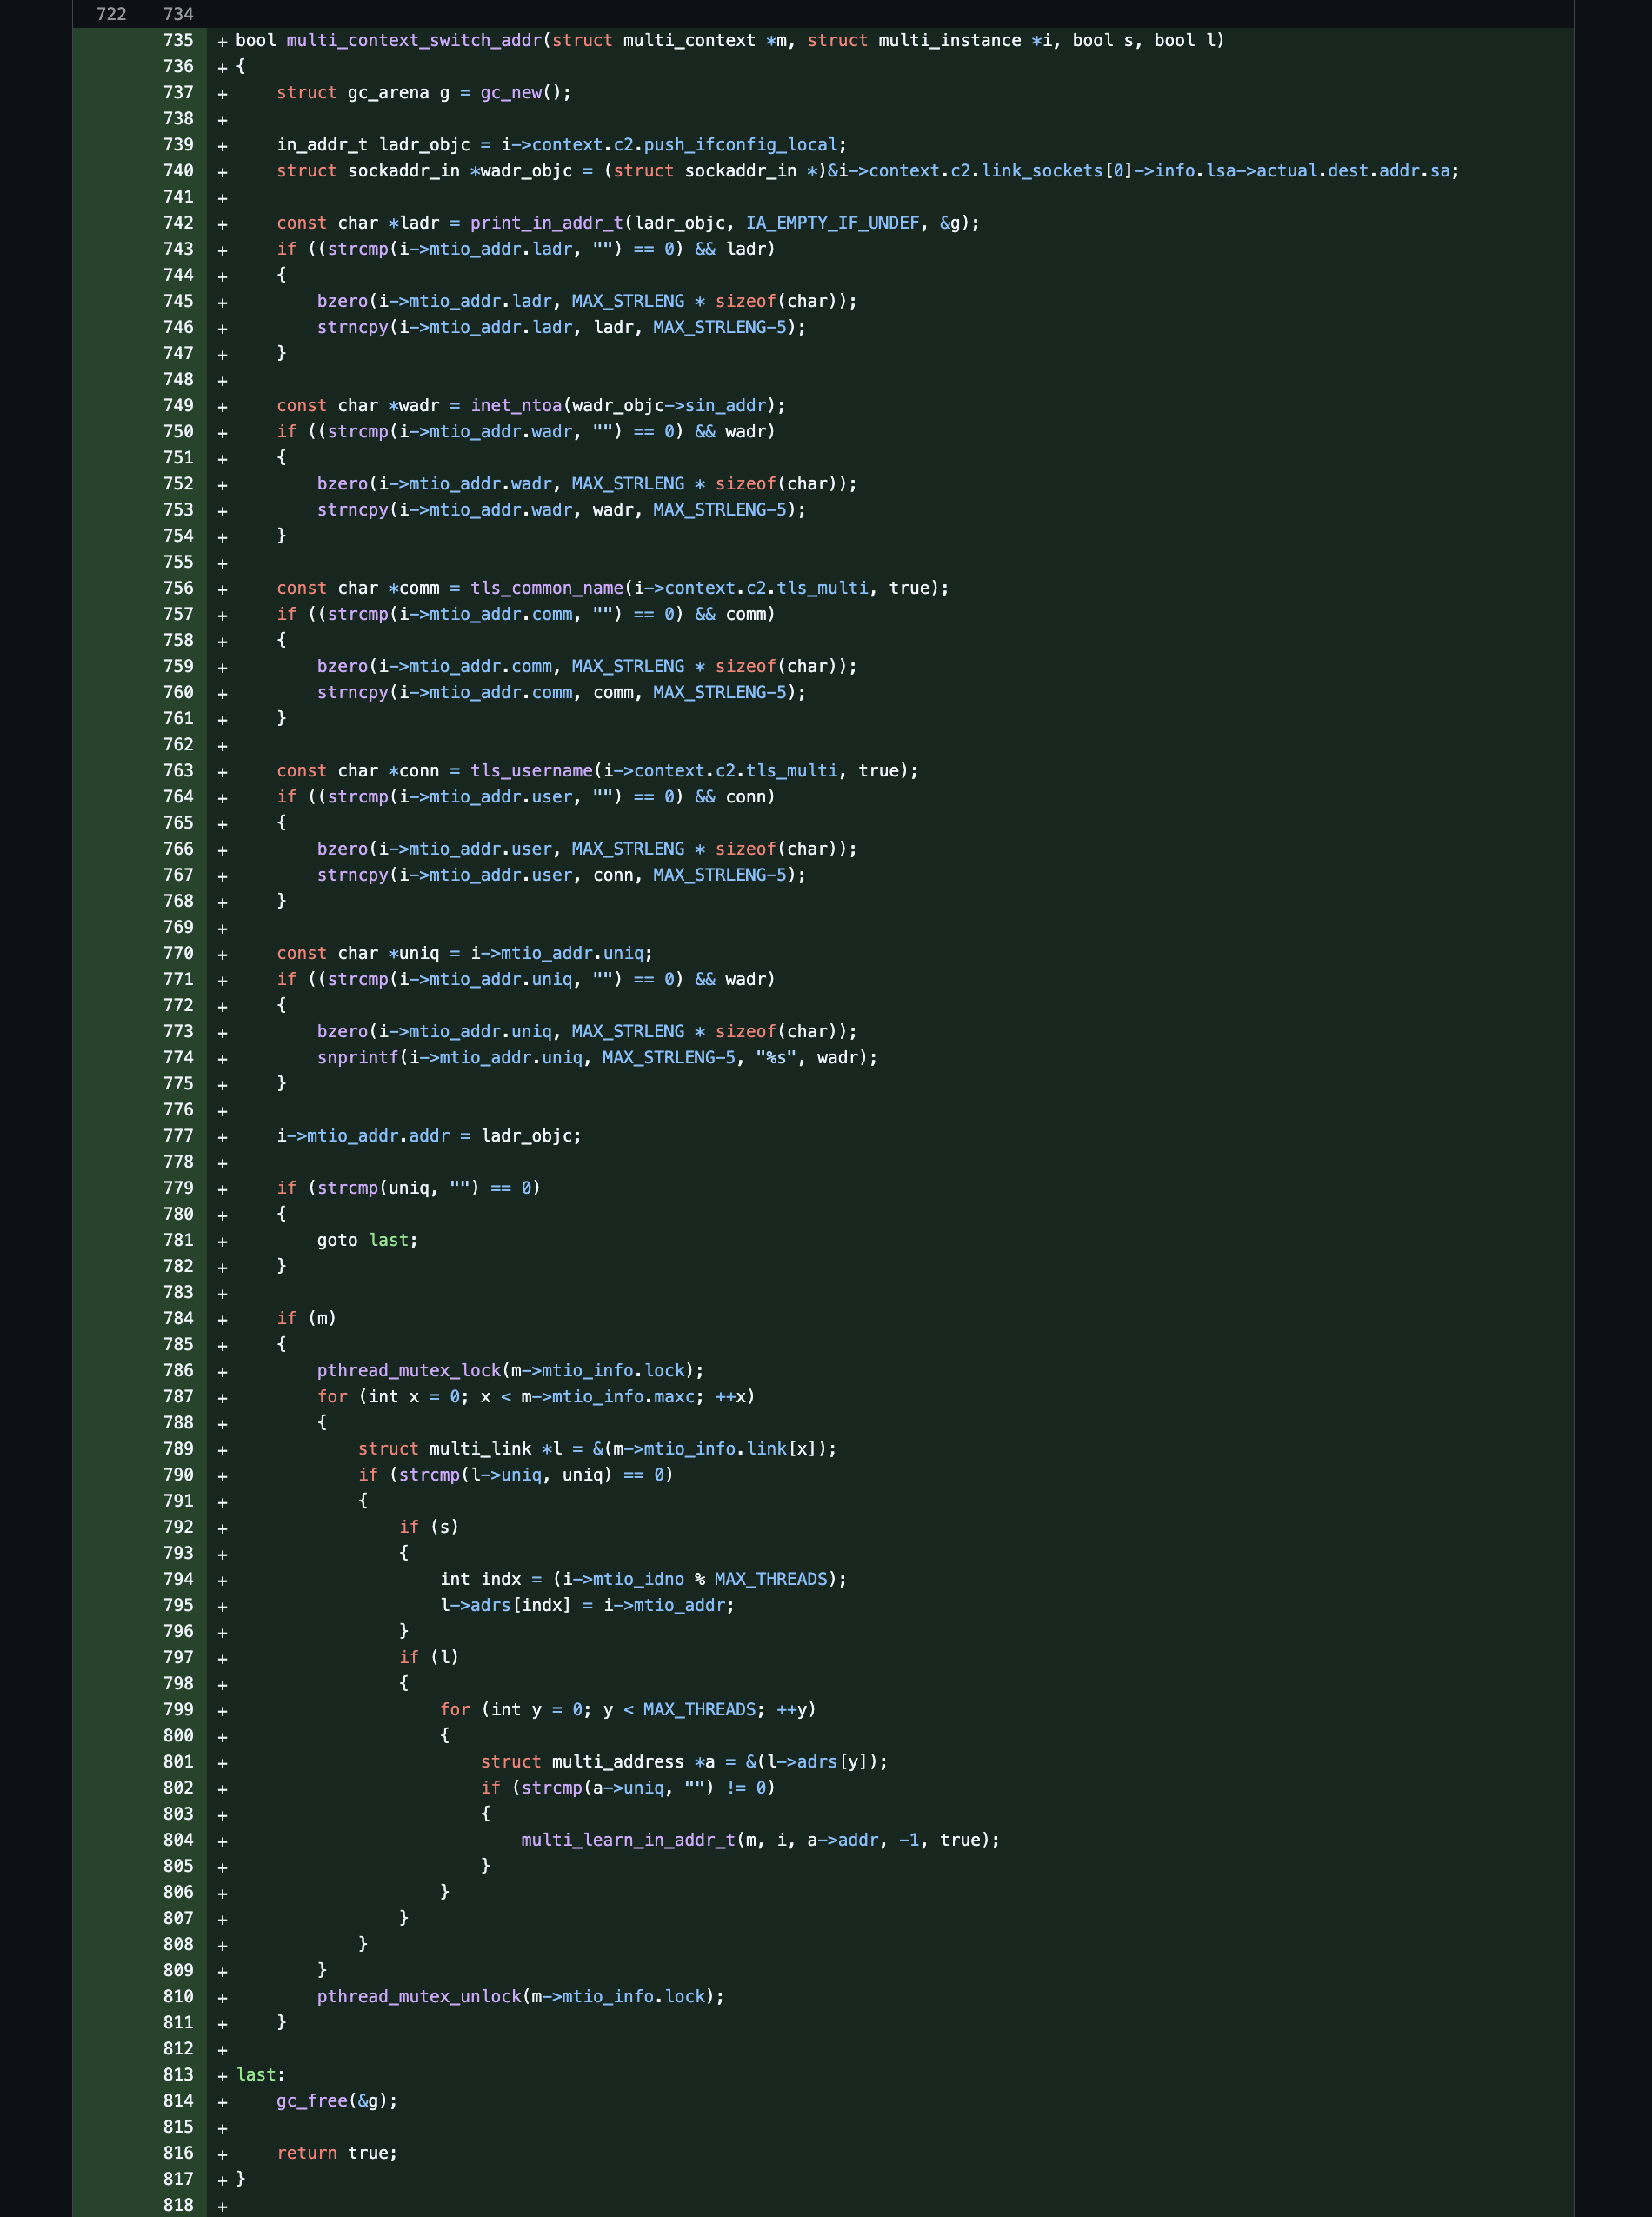
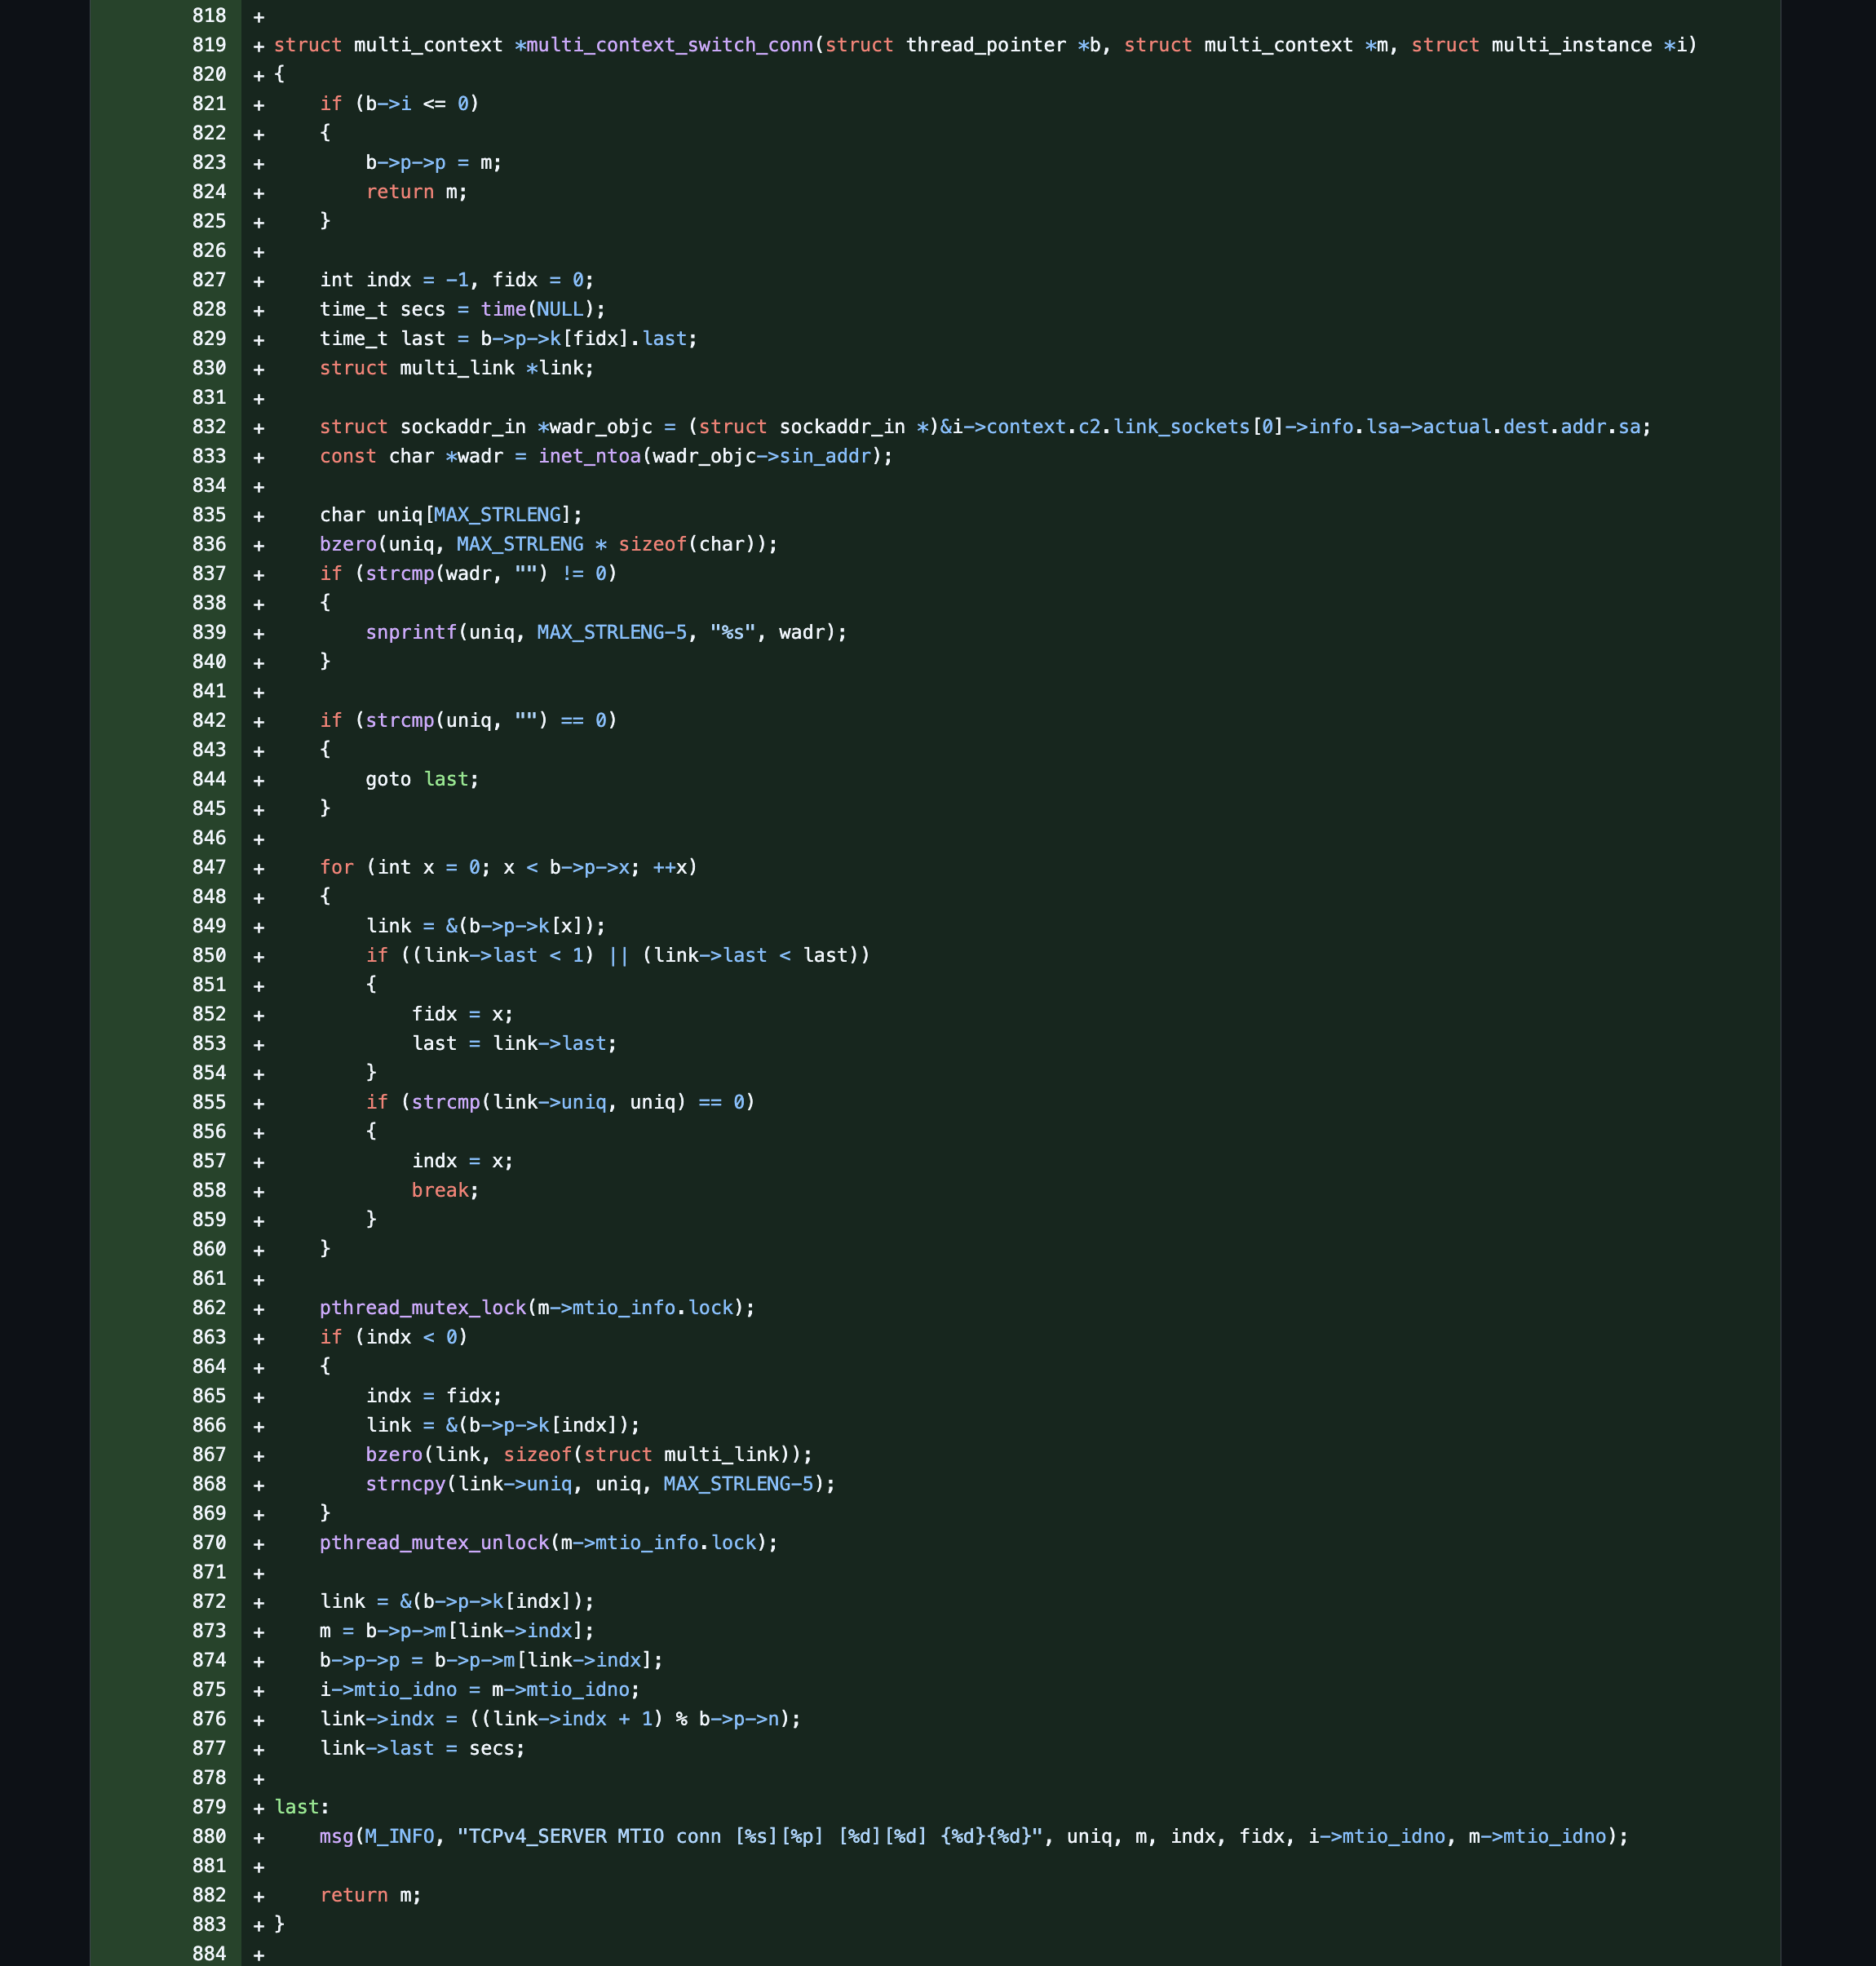
Source Code: https://github.com/stoops/openvpn-fork/compare/bulk…mtio

Pull Request: https://github.com/OpenVPN/openvpn/pull/818/files

~

Modifying OpenVPN Source Code to Allow for Bulk-Reads, Max-MTU, and Jumbo-TCP for Highly Improved Performance!

So some time back, I wrote this highly-performant, network-wide, transparent-proxy service in C which was incredibly fast as it could read 8192 bytes off of the client’s TCP sockets directly and proxy them in one write call over TCP directly to the VPN server without needing a tunnel interface with a small sized MTU which bottlenecks reads+writes to <1500 bytes per function call.

I thought about it for a while and came up with a proof of concept to incorporate similar ideas into OpenVPN’s source code as well. The summary of improvements are:

  • Max-MTU which now matches the rest of your standard network clients (1500 bytes)
  • Bulk-Reads which are properly sized and multiply called from the tun interface (6 reads)
  • Jumbo-TCP connection protocol operation mode only (single larger write transfers)
  • Performance improvements made above now allows for (6 reads x 1500 bytes == 9000 bytes per transfer call)

As you can see below, this was a speed test performed on a Linux VM running on my little Mac Mini which is piping all of my network traffic through it so the full sized MTU which the client assumes doesn’t have to be fragmented or compressed at all! 🙂

Note: Also, the client/server logs show the multi-batched TUN READ/WRITE calls along with the jumbo-sized TCPv4 READ/WRITE calls.

Note-Note: My private VPS link is 1.5G and my internet link is 1G and my upload speed is hard rate limited by iptables and this test was done via a WiFi network client and not the actual host VPN client itself which to me makes it a bit more impressive.

Edit: The small size MTU problem that can affect both WireGuard and OVPN-UDP is documented here by another poster: https://gist.github.com/nitred/f16850ca48c48c79bf422e90ee5b9d95

~

~

~

~

I created a new GitHub repo with a branch+commit which has the changes made to the source code.

Patch Diff:

Fork Pull:

Maling List:

~

Generating colorful iOS backgrounds in less than 50 lines of JS and some basic photo editing skillz

<script>
	//scroll to bottom
	//shot 1475 x 935 (2950 x 1870)
	//sips --rotate -35 a.png --out b.png ; cp -fv b.png c.png
	//crop 768 x 1665
	//noise 5, vintage 15
	function a() {
		var l = [
			[113,  73, 173, 1.25, 1, "purple"],
			[171,  51,  51, 0.50, 1, "red"],
			[245, 115,  35, 0.75, 1, "orange"],
			[255, 215, 125, 0.75, 5, "gold"],
			[ 69, 139,  69, 0.50, 1, "green"],
			[ 33, 153, 243, 1.25, 3, "blue"],
			[113,  73, 173, 1.15, 1, "purple"],
			[113,  73, 173, 1.00, 1, "purple"],
		];
		var o = [0.97, 0.93];
		var p = 750;
		var h = 15;
		var n = parseInt((((p/h)-1)/(l.length-1))-1);
		if (n < 1) { n = 1; }
		n = ((n + 3) + (n % 2));
		var t = 0;
		var u = "";
		var z = document.getElementById("a");
		for (var i = 0; i < l.length; ++i) {
			var k = (i + 1);
			var r = l[i][3];
			var s = l[i][4];
			var m = parseInt(n * r);
			u += (l[i][5]+" "+i+" "+n+" "+r+" "+s+" "+m+"\n");
			for (var j = 0; j < s; ++j) {
				z.innerHTML += ("<div style='height:"+h+"px; background:rgba("+l[i][0]+", "+l[i][1]+", "+l[i][2]+", "+o[0]+");'></div>");
			}
			for (var j = 0; (j < m) && (k < l.length); ++j) {
				var a = ((((l[k][0] - l[i][0]) - 1) / (m + 1)) * (j + 1));
				var b = ((((l[k][1] - l[i][1]) - 1) / (m + 1)) * (j + 1));
				var c = ((((l[k][2] - l[i][2]) - 1) / (m + 1)) * (j + 1));
				var d = (l[i][0] + a);
				var e = (l[i][1] + b);
				var f = (l[i][2] + c);
				z.innerHTML += ("<div style='height:"+h+"px; background:rgba("+d+", "+e+", "+f+", "+o[1]+");'></div>");
			}
			if (i < (l.length - 1)) { t += ((m * h) + (h * s)); }
		}
		alert(n+"\n"+t+"\n"+u);
	}
</script>
<body onload="a();">
	<div id="a"></div>
</body>

~

~

TurnTable – A MacOS App In Swift – Starting From Scratch And Copying iTunes!

It’s been a while since I’ve posted here on the good old blog, I’ve been busy with life and work, however, that may change soon as the big 5 banks in Canada are now forcing everyone to a mandated RTO back in to downtown Toronto. I had to move out of the city some years back due to the cost of living crisis here so I may be out of a job come September.

App Store: https://apps.apple.com/ca/app/turntable/id6747615304?mt=12

Anyway, I started a new MacOS app in Swift called TurnTable which is written from scratch to try and copy the old spirit and simplicity of the original iTunes application. It doesn’t have anything fancy yet implemented but I just wrote it all today and am posting the source code of course up on my github. I will try to add more features to it over time when I get a free chance to do so!

Source Code: https://github.com/stoops/TurnTable/tree/main

~

Getting Back Into Elliptic Curve Basics with C and OpenSSL

With this network-wide layer-4 forward-proxy service running a bit better now, I had originally implemented a highly-modified version of the ARC4 symmetric stream cipher with a keyed checksum hashing method to work together. The one part I was missing was an EC asymmetric cipher to help protect a Diffie–Hellman based ephemeral key exchange. It’s been a number of years since I’ve experimented with this but I started an implementation using the C OpenSSL library to use a pre-generated EC key pair to protect a DH key exchange which can be used at the start of the proxy tunnel connection. You can use the openssl command to generate the EC key pair and then use this framework to load them in and perform an encrypted ECDH key exchange. As you can see below, there are a few steps needed to complete this transaction:

  • The client generates an ephemeral EC key pair and encrypts the ephemeral public key with the generated public key and sends this to the server
    • The server decrypts the ephemeral public key with the generated private key
  • The client creates a secret number to multiply with a generated curve point and encrypts this with the generated public key and sends this to the server
    • The server decrypts the clients key exchange with the generated private key and multiplies it with the server secret number to get a shared secret
  • The server creates a secret number to multiply with a generated curve point and encrypts this with the ephemeral public key and sends this to the client
    • The client decrypts the servers key exchange with the ephemeral private key and multiplies it with the client secret number to get a shared secret
  • You can see near the end there are two lines labelled “rx …. dhkx:” which contain the same shared X & Y points on the EC curve which were encrypted using the basic scheme above!

Source Code: https://github.com/stoops/eckx/tree/main

~

Lessons Learned From Working On A Multi-Year Transparent-Proxy Network-Wide Project

Over the years I’ve been trying to run a custom-made layer-4 transparent-proxy service for most of my entire network to use automatically (zero client configuration). It first started because I did not like the general idea of a VPN server using a sub-1500 MTU setting while all of the clients on a network auto-assume a 1500 MTU themselves. In addition, instead of reading 1500 bytes at a time off of a TUN interface, you can instead read 8192 bytes off of a TCP socket at a time which you can then feed to a fast stream cipher without the need for packet fragmentation. However, it took me quite a while to reach some stability with tracking all of the connection state types and to iron out all the issues that could arise from transparently proxying both UDP and TCP connections. Some of the lessons I learnt that might help others trying a similar approach include the following:

  • Make sure to increase the number of file descriptors to handle all of the sockets and pipes per each process/thread running
    • Ex: ulimit -n 65536
  • Make sure to check for any remapped duplicated source port entries in the connection state tracking table based on dport after checking sport first
    • Ex: conn=$(echo "${outp}" | grep -i " src=${addr} .* dport=${port} " | grep -i "${prot}")
  • Make sure to DNAT load balance UDP client traffic based on source IP+PORT ranges instead of the connection state or statistic mode modules
    • Ex: multiport sports 0:53133 to:192.168.1.1:3135
    • Ex: multiport sports 53134:57267 to:192.168.1.2:3135
  • Make sure to pay attention to the finer details of properly managing connection states and process/thread states throughout the entire code base
    • Ex: Create a separate thread that is dedicated to managing the file descriptors and processing states

I will try to post more tips as time goes on and I learn more but these small issues can cause a lot of headaches when you’re trying to translate and redirect thousands of network wide connections down into separated processes for load balancing purposes! 🙂

~

I forgot to post, happy new year!

I’ve been trying to get things in order before the end of last year and into this new year of 2025 so I can try to lessen any worries that might come up. I was doing a complete re-write of the core network-wide proxy-service and this time I have also tried to write it in both Python and C so the code bases so mostly match and line up with each other. The main problem I think is that I tried to generalize and condense the code base too much and I think this can cause problems as the packet tracking for UDP and connection state for TCP is a bit different from each other. This time I have separated out each component into its own dedicated section, the downside is that it’s a much larger code base with potentially duplicated code snippets. It’s a strange kind of project and hard to describe it but the best way I can think of it as is a Transparent Layer 4 MITM/Proxy service 😀

The core components now have the following layouts:

ProtocolModeOperation
UDPClientSend
UDPClientRead
UDPServerSend
UDPServerRead
TCPClientSend
TCPClientRead
TCPServerSend
TCPServerRead

Edit: Note to my future self, always remember to ulimit -n 65536 before launching!

Note: This post is a follow up from the previous: [post] [post]

I’m still fine tuning & adjusting it but the source code links can be found here:

https://github.com/stoops/pyproxy/

https://github.com/stoops/vpn/

~

Apple Finally Did It, They Beat Intel – The M4 Max Is A Beast, What Will The M4 Ultra Be?

And is it soon time for the M4 Extreme? :O (:


~


Edit: Some prediction calculations 🙂

M2 Max Multi Score: 14678
M2 Ultra Multi Score: 21352 (~46% increase between max & ultra)
M4 Max Multi Score: 26675
M4 Ultra Multi Prediction: 38945 (using roughly the same 46% increase from M4 Max)
M4 Extreme Multi Prediction: 77891 (multiplying the M4 Ultra prediction by 2?)

Apple Did It Again – Thunderbolt 5 – Expect Newer/Better Displays Finally! (:

Apple just introduced Thunderbolt 5 which with its higher bandwidth will finally allow for the true and properly designed displays that I think Apple was waiting for. I predict possibly a 27/32/36 inch line up with 5/6/8K resolutions with 120Hz refresh rate. The only remaining question is, will it be Mini-LED for multiple dimming zones or possibly OLED?

Things I use the Mac Mini for:

  • Network Backup / Storage
  • Local Web App Services (iPhone/iPad/Airpods)
  • Plex Media Server (AppleTV)
  • Linux Proxy Server VM (Parallels)

The iPhone Line Up Grid and Nice iOS Updates

The latest version of iOS brought some nice updates to allow you to customize the look and feel even further than before. It has allowed me to set 2 shortcuts on the home screen (one for my switch bot app and one for my custom MacBook controller web app). I also like the larger dark mode icons without the text labels below them. Here are my current screenshots and setup:

~

When Steve Jobs came back to Apple, he drew a 2×2 grid to reorganize the Mac product line up and offerings. I believe the iPhone needs a similar grid in 2×3 form, for example:

iPhoneSmall
< 6.0”
Medium
> 6.0”
Large
< 7.0”

Consumer
5.5” OLED Screen
2 Cameras Embedded
120Hz Display
Med Size Storage
6.1” OLED Screen
2 Cameras Embedded
120Hz Display
Med Size Storage
6.7” OLED Screen
2 Cameras Embedded
120Hz Display
Med Size Storage

Prosumer
5.7” OLED Screen
3 Cameras Embedded
120Hz AOD
Large Size Storage
6.3” OLED Screen
3 Cameras Embedded
120Hz AOD
Large Size Storage
6.9” OLED Screen
3 Cameras Embedded
120Hz AOD
Large Size Storage

Starting a new app for iPhone that allows for some pre-styled/formatted widgets to be used!

I am using this page as the officially documented support page for a new iOS app called “Widgets Factory”

It has been recently initially approved and released to the iOS App Store!

~

Here are some example screenshots:

~

Known Issues

The background task and refresh processing capabilities on iOS are severely limited and hampered due to some of the more hostile protection mechanisms built in. I will also say that these protection mechanisms do serve a good purpose as to try and protect the battery life and foreground processing requests to give the user a better mobile experience. It would still be nice if Apple could improve the background system to guarantee some additional service capabilities:

  • Don’t sleep or stop the apps non-main thread if it is registered and expecting a background refresh, instead provide a minimum/minimal percentage of dedicated processing time overall
  • Ensure that the requested caller gets a background refresh process time after waiting a maximum of 5-15 minutes
  • Provide a specific API method call that is background approved to perform the basic needed tasks on behalf of the calling application with a minimal guaranteed processing time:
    • Location Coordinates
    • Map Snapshots
    • Web Fetches
    • Widget Views
    • Push Notifications

Future Wishes

It would also be nice for apps that are free without ads to be able to have a one-time (or even re-occurring) tip jar that user’s could donate whatever amount they feel comfortable with to the developer.

Contact Information

  • root<ats>fossjon<dot>com
  • Or comment on this post!

~